IOS-XE基本操作
目的
- 各モードの動作を理解する
- 各モードで実行できるコマンドを理解する
- 設定変更時の一連の流れを理解する
ハンズオン
1, ユーザ EXEC mode
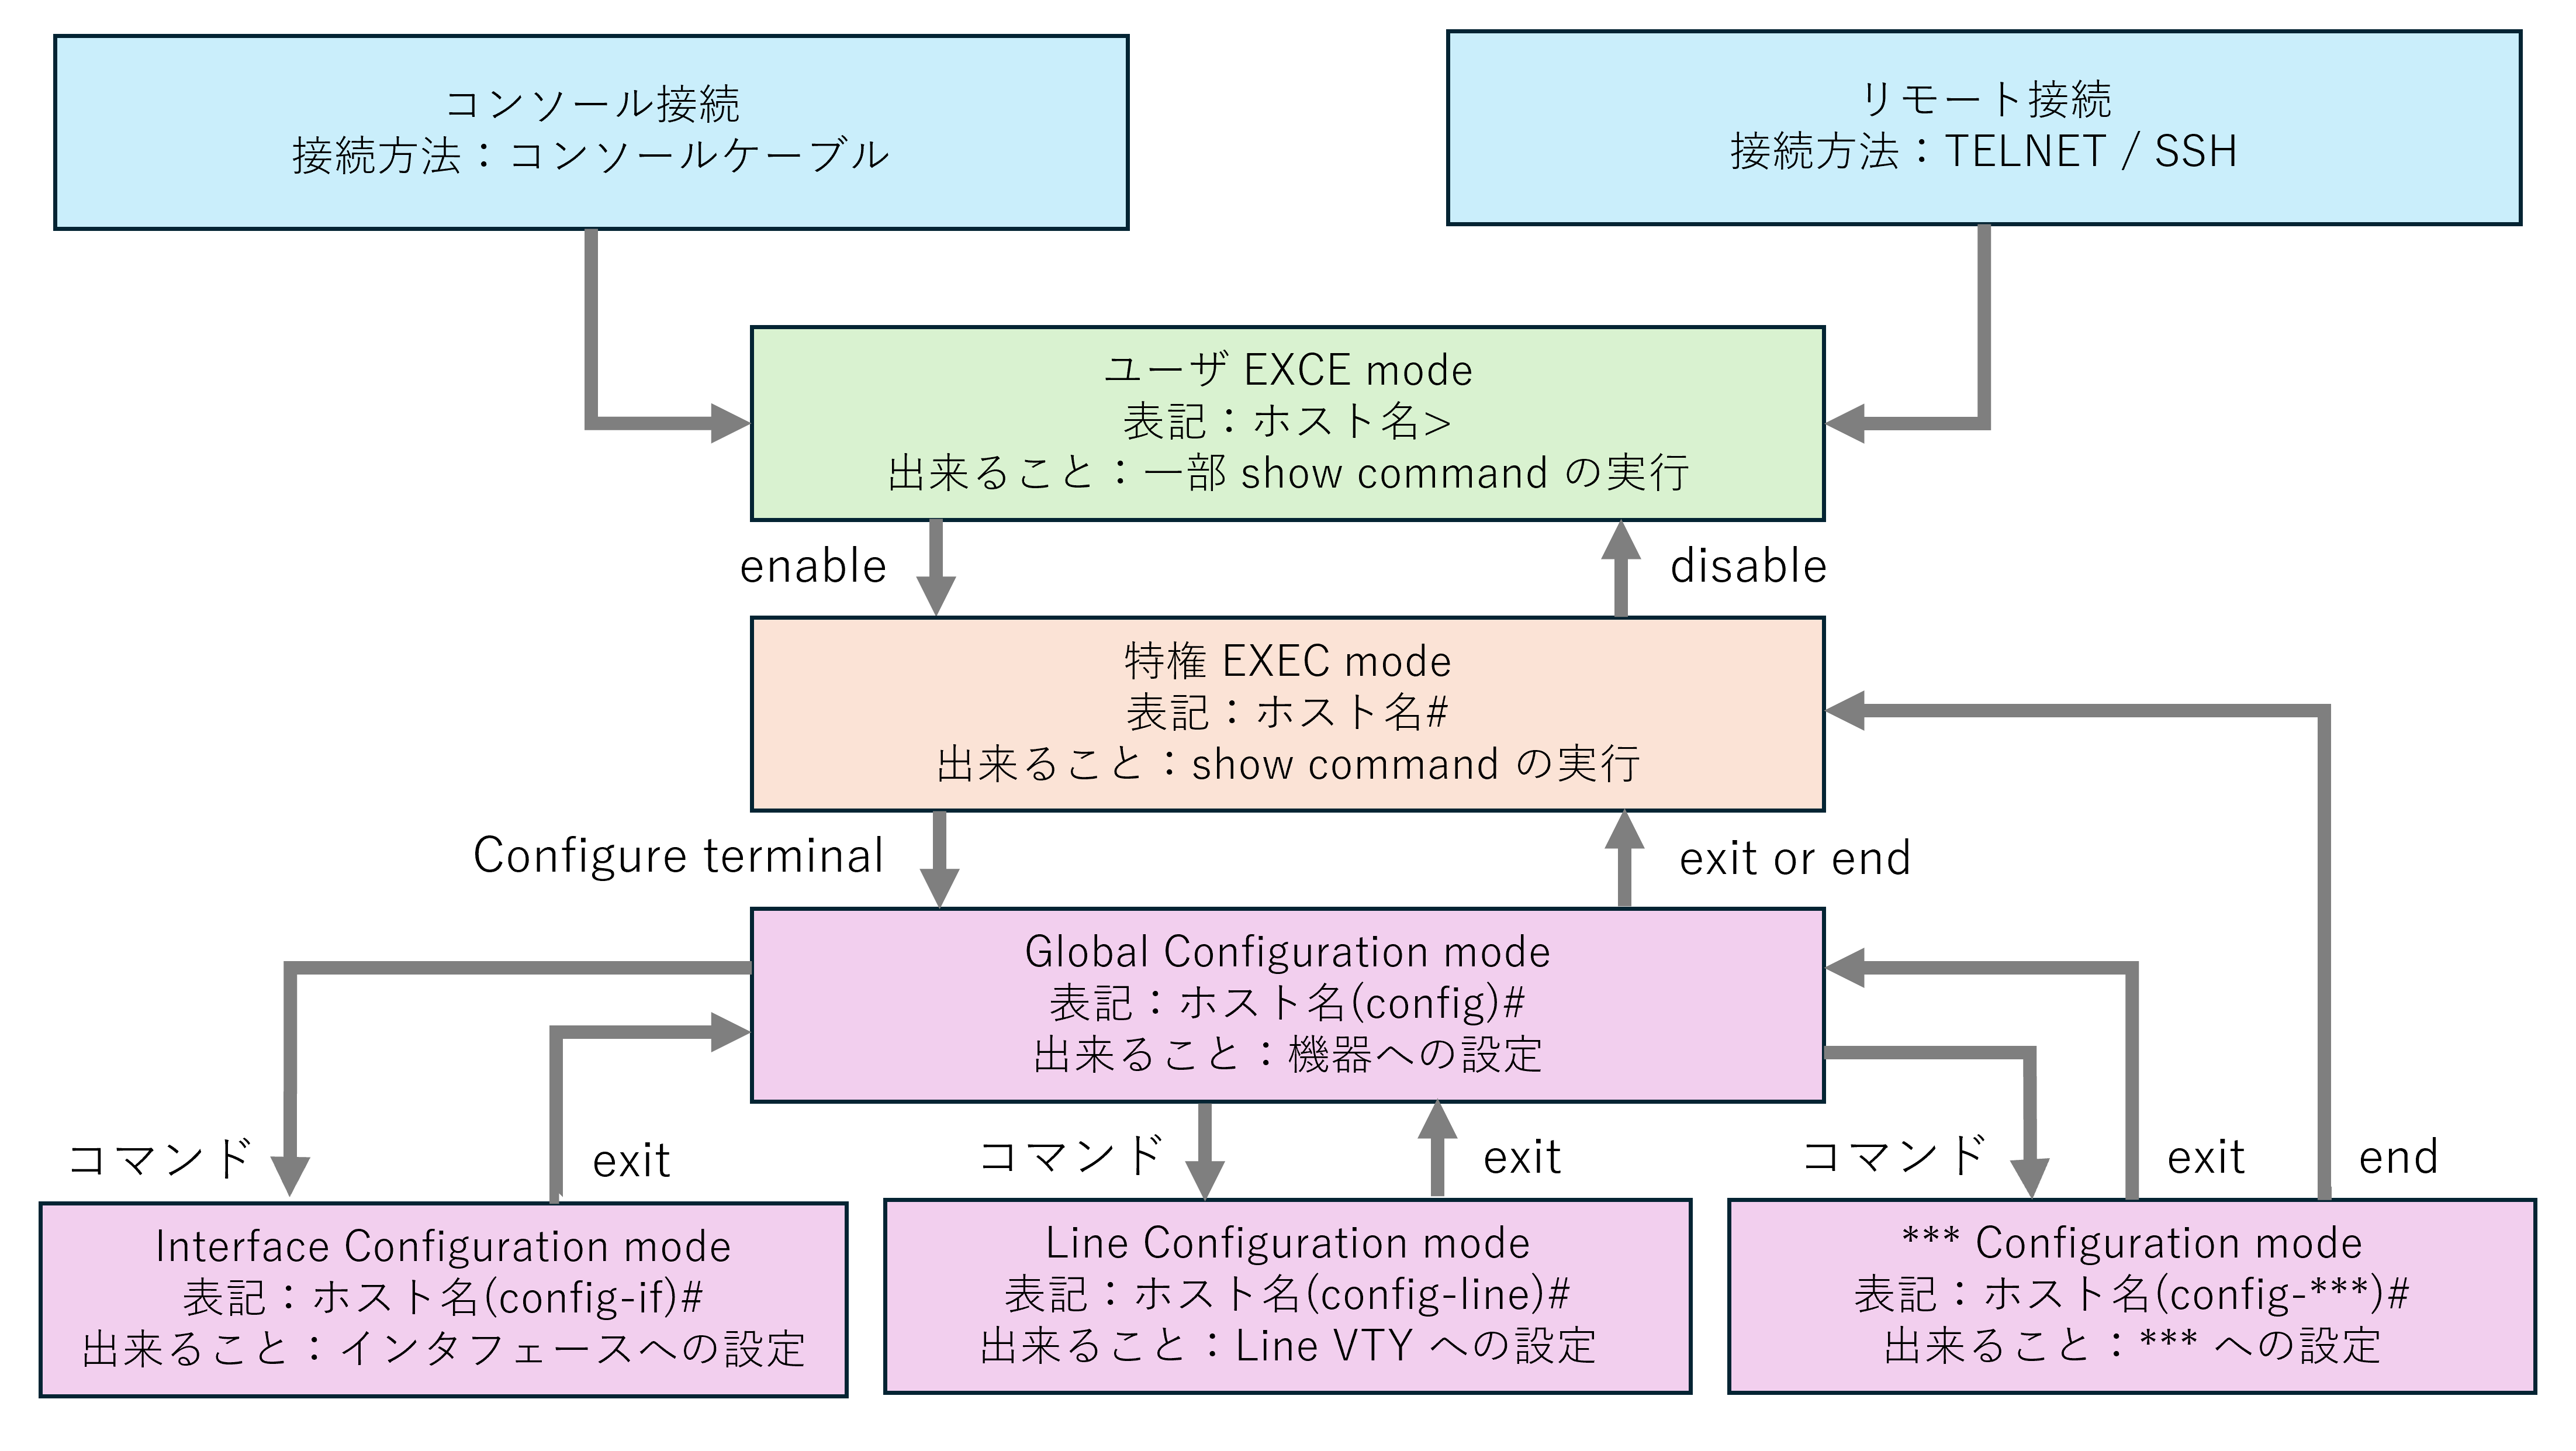
ネットワーク機器 (IOS/IOS-XE) には "モード" の概念があり、以下のようになっています。
各モードへは指定のコマンドを実行することで移行することが出来、「すべての Configuration mode」からは "end" を実行することで「特権 EXEC mode」へ移行することができます。
そして、初期設定ではネットワーク機器に接続すると「ユーザ EXEC mode」からスタートします。
Press RETURN to get started.

*May  5 11:13:35.566: %SYS-6-TTY_EXPIRE_TIMER: (exec timer expired, tty 0 (0.0.0.0)), user
inserthostname-here>
このモードでは主に一部の show command を使うことができます。また、使用できるコマンドは「?」を入力することで確認できます。
inserthostname-here>show ?
  aaa                         Show AAA values
  access-lists                List access lists
  accounting                  Show accounting
  acircuit                    Access circuit info
  adjacency                   Adjacent nodes
  alps                        Alps information
  ancp                        ANCP information
  arp                         ARP table
  auto                        Show Automation Template
  auto-ip-ring                Auto-IP-Ring information
  backup                      Backup status
  banner                      Display banner information
  bfd                         BFD protocol info
  bgp                         BGP information
  bootvar                     Boot and related environment variable
  bridge-domain               Bridge-domain
  calendar                    Display the hardware calendar
  call                        Show call
  capability                  Capability Information
  cca                         CCA information
  class-map                   Show CPL Class Map
  clock                       Display the system clock
  cns                         CNS agents
  compress                    Show compression statistics
  connection                  Show Connection
  controllers                 Interface controller status
  cops                        COPS information
  crypto                      Encryption module
  dampening                   Display dampening information
  dcm                         Data Collection Manager Core Details
  dialer                      Dialer parameters and statistics
  drip                        DRiP DB
  eigrp                       EIGRP show commands
  end-user-license-agreement  End User License Agreement (EULA)
  esmc                        Ethernet Synchronization Messaging Channel
  ethernet                    Ethernet parameters
  event-manager               Event manager information
  exception                   exception informations
  fhrp                        FHRP information
  flooding-suppression        Display Flooding Suppression information
  flowspec                    FlowSpec information
  format                      Show format information
  fqdn                        Show for FQDN Manager subsystem
  fras-host                   FRAS Host Information
  funi                        FUNI information
  graceful-reload             Graceful reload information
  group-policy                Group Policy
  hosts                       IP domain-name, lookup style, nameservers, and
                              host table
  id-manager                  ID pool manager
  if-mgr                      if-mgr information
  inventory                   Show the physical inventory
  ip                          IP information
  ipam                        IP Addr Mgr (IPAM) information
  ipc                         Interprocess communications commands
  ipv6                        IPv6 information
  kerberos                    Show Kerberos Values
  keystore                    Show keystore information
  kron                        Kron Subsystem
  l2fib                       Layer 2 Forwarding Information Base
  l2rib                       L2 Routing Information Base
  l2route                     Show L2 routes
  l2vpn                       Show information about Layer2 VPN
  lacp                        Port channel information
  lisp                        Locator/ID Separation Protocol
  lldp                        LLDP information
  llp                         NHRP multicast map for link layer protocols
  location                    Display the system location
  login                       Display Secure Login Configurations and State
  management                  Display the management applications
  mcsa                        mcsa info
  mdns-sd                     mDNS Gateway
  memory                      Memory statistics
  modemcap                    Show Modem Capabilities database
  mpls                        MPLS information
  mtm                         MTM
  mvpn                        Multicast VPN Information
  nat46                       NAT64 information
  nat64                       NAT64 information
  nat66                       NAT66 information
  ncia                        Native Client Interface Architecture
  network-clocks              Network Clock
  nid                         NID Configuration
  odm-format                  Show the schema used for ODM input file
  ospfv3                      OSPFv3 information
  parser                      Display parser information
  pce                         Path Computation Element Protocol information
  pdm                         Display PDM info
  performance-measurement     Performance Measurement Information
  pnp                         Display PNP information
  policy-map                  Show Policy Map
  ppp                         PPP parameters and statistics
  pppoe                       PPPoE information
  pw-udp                      Pseudowire UDP Information
  qbm                         QoS Bandwidth Manager information
  radius                      Shows radius information
  rbscp                       RBSCP information
  redundancy                  Redundancy Facility (RF) information
  resource-group              Resource group statistics
  rgf                         RGF groups and statistics
  route-tag                   route-tag information
  rpl                         RPL protocol status
  sasl                        show SASL information
  scalable-queue              Scalable Queue statistics
  service-group               Show service group information
  service-overlay             Service Overlay show commands
  service-routing             Service-Routing show commands
  sessions                    Information about Telnet connections
  sgbp                        SGBP group information
  snmp                        snmp statistics
  sockets                     Socket Details
  ssh                         Status of SSH server connections
  sss                         Subscriber Service Switch Information
                              (deprecated, use "show subscriber ...")
  subscriber                  Subscriber Service Switch Information
  system                      Show system information
  tacacs                      Shows tacacs+ server statistics
  tag-switching               Tag Switching information
  template                    Template information
  terminal                    Display terminal configuration parameters
  test_rib_access             RIB_ACCESS TEST info
  time-range                  Time range
  tod-clock                   Time-of-Day Clock
  topology                    Topology instance information
  udp                         UDP Details
  users                       Display information about terminal lines
  version                     System hardware and software status
  vfi                         Virtual Forwarding Instance information
  vnet                        Virtual NETwork instance information
  vpdn                        VPDN information
  vrf                         VPN Routing/Forwarding instance information
  vrrp                        VRRP information
  vrrs                        VRRS information
  wsma                        Show Web Services Management Agents information
  xconnect                    Xconnect information
  xmpp                        Show Extensible Messaging and Presence Protocol
                              information
  xos                         Cross-OS Library Information and Traces
  xsd-format                  Show the ODM XSD for the command
  <cr>                        <cr>
2, 特権 EXEC mode
「ユーザ EXEC mode」から "enable" command を実行することで、「特権 EXEC mode」に移行することができます。
また、文字列の入力途中で 「Tab キー」を押下することで、コマンドを保管することができます。
ここでは "ena" と入力後に「Tab キー」を押下して、"enable" に保管されていることが確認できます。そして、そのまま "enable" command を実行することで「特権 EXEC mode」に移行されます。
inserthostname-here>ena
inserthostname-here>enable
inserthostname-here#
「特権 EXEC mode」では全ての show command を使用することができます。例えば "show running-config" が実行でき、これは現在の機器の設定を確認することができます。
ネットワーク機器にて最も使用する show command の1つです。
inserthostname-here#show running-config
Building configuration...

Current configuration : 905 bytes
!
! Last configuration change at 11:01:00 UTC Tue May 5 2026
!
version 17.16
service timestamps debug datetime msec
service timestamps log datetime msec
!
hostname inserthostname-here
!
boot-start-marker
boot-end-marker
!
!
no aaa new-model
!
!
!
!
!
!
!
 --More--
出力量が多い "show command" を実行すると上記のように "--More--" が表示され、「Enter キー」や「Space キー」を押下することで続きが確認できます。また、「Q キー」を押下すると出力を中断できます。
"terminal length" command を実行すると show command 実行時に一度に表示される行数を指定することができます。
"terminal length" は一時的な設定で機器からログアウト(一定時間操作なしのタイムアウトを含む)するとリセットされ、作業中は出力が見やすいよう "terminal length 0" (全ての出力を一括表示する)を実行することが一般的です。
inserthostname-here#ter
inserthostname-here#terminal le
inserthostname-here#terminal length 0
inserthostname-here#
inserthostname-here#show run
inserthostname-here#show running-config
Building configuration...

Current configuration : 905 bytes
!
! Last configuration change at 11:01:00 UTC Tue May 5 2026
!
version 17.16
service timestamps debug datetime msec
service timestamps log datetime msec
!
hostname inserthostname-here
!
boot-start-marker
boot-end-marker
!
!
no aaa new-model
!
!
!
!
!
!
!
!
!
!
!
!
!
ip cef
login on-success log
no ipv6 cef
!
!
!
!
!
!
!
!
!
!
!
!
!
memory free low-watermark processor 79983
!
!
spanning-tree mode rapid-pvst
!
!
!
!
!
!
!
!
!
!
!
!
!
!
!
!
!
!
!
!
!
!
!
interface Ethernet0/0
 no ip address
 shutdown
!
interface Ethernet0/1
 no ip address
 shutdown
!
interface Ethernet0/2
 no ip address
 shutdown
!
interface Ethernet0/3
 no ip address
 shutdown
!
ip forward-protocol nd
ip forward-protocol udp
!
!
ip http server
ip http secure-server
ip ssh bulk-mode 131072
no logging btrace
!
!
!
control-plane
!
!
!
line con 0
 logging synchronous
line aux 0
line vty 0 4
 login
 transport input ssh
!
!
!
!
end

inserthostname-here#
3, Global Configuration mode
「特権 EXEC mode」から "configure terminal" command を実行することで、「Global Configuration mode」に移行することができます。
また、下記のようにコマンド入力時は一部コマンドを省略が可能となっています。
例えば、"configuration terminal" は "conf t" と省略して入力が可能です。どのこコマンドがどこまで省略できるかはコマンドによるため都度ご確認ください。
inserthostname-here#conf t
Enter configuration commands, one per line.  End with CNTL/Z.
inserthostname-here(config)#
「Global Configuration mode」では機器全体に対する設定を行ったり、特定の設定モードに移行することができます。
例えば、"hostname" command を実行するとホスト名が変更されます。また、IOS/IOS-XE では実行したコマンドが即時に反映されるため、業務での設定変更では内容に誤りがないか確認することが非常に重要です。
inserthostname-here(config)#hostname RT1
RT1(config)#
合わせて操作の log を表示させるため、"logging console" command も設定しておきます。
RT1(config)#logging console
「Global Configuration mode」では "do" を使用することで「特権 EXEC mode」に戻らずとも show command が実行できます。
例えば "show running-config" を実行すると、hostname が RT1 に変更されていることが確認できます。
RT1(config)#do show run
Building configuration...

Current configuration : 889 bytes
!
! Last configuration change at 11:01:00 UTC Tue May 5 2026
!
version 17.16
service timestamps debug datetime msec
service timestamps log datetime msec
!
hostname RT1
!
boot-start-marker
boot-end-marker
!
!
no aaa new-model
!
!
!
!
!
!
!

RT1(config)#
※表示を省略しています
4, 特定の Configuration mode
「Global Configuration mode」から特定のコマンドを実行することで、「設定対象の Configuration mode」に移行することができます。
今回は例として「Interface Configuration mode」へ移行してみます。まず、この機器が持つ Interface を調べるため show command を実行します。(do を使用する際は TAB キーによる保管は使えません。)
RT1(config)#do show interfaces description
Interface                      Status         Protocol Description
Et0/0                          admin down     down
Et0/1                          admin down     down
Et0/2                          admin down     down
Et0/3                          admin down     down
すると、出力から以下の情報がわかります。
・Eth0/0 ~ Eth0/3 が存在する
・各 Interface は admin down (shutdown) となっている
続いて、Eth0/0 (Ethernet0/0) を "no shutdown" するため Eth0/0 に移行してみます。
RT1(config)#interface ethernet0/0
RT1(config-if)#
Interface Configuration mode に移行できたので表示形式が "RT1(config-if)#" となっていることがわかります。
続いて log を出力させるため、
ここで "no shutdown" command を設定してみます。
RT1(config-if)#no shutdown
RT1(config-if)#
*May  5 12:06:26.457: %LINK-3-UPDOWN: Interface Ethernet0/0, changed state to up
RT1(config-if)#
*May  5 12:06:27.457: %LINEPROTO-5-UPDOWN: Line protocol on Interface Ethernet0/0, changed state to up
すると設定が完了し、上記のような log が出力されました。先ほどと同様に show command を実行してスタータスが変化したことを確認します。
コマンドを実行すると Et0/0 のスタータスが以下のように変化したことがわかります。
Status : admin down ⇒ up
Protocol Description : down ⇒ up
RT1(config-if)#do show interface description
Interface                      Status         Protocol Description
Et0/0                          up             up
Et0/1                          admin down     down
Et0/2                          admin down     down
Et0/3                          admin down     down
RT1(config-if)#
このように、設定したい内容に応じて「Global Configuration mode」や「特定の Configuration mode」に移行して設定を行います。
最後に設定保存を行います。IOS や IOS-XE では設定内容は即時反映されますが、設定保存しなければ機器が再起動すると保存前の設定に戻ってしまいます。
これは機器が起動時に "startup-config" を参照して起動するためです。まずは ”show startup-config" で現在の "startup-config" を確認してみましょう。
”end" で「特権 EXEC mode」に戻り
"terminal length 0" で一括表示にし
"show startup-config" を実行します
RT1(config-if)#end
RT1#ter len
*May  5 12:16:51.148: %SYS-5-CONFIG_I: Configured from console by console
RT1#ter len 0
RT1#
RT1#show start
RT1#show startup-config
startup-config is not present
RT1#
すると "startup-config is not present" を表示され、"startup-config" が存在しないことがわかります。そのため、現在の設定を保存することで "startup-config" を生成 (上書き) します。
設定保存は
"write memory" もしくは "copy running-config startup-config"
実行することで可能です。内容に差異はありません。
ここでは "write memory" を実行してみます。
RT1#write memory
Building configuration...
[OK]
RT1#
続いて ”show startup-config" を実行します。すると、”startup-config" が表示されます。
また、「Last configuration change at …」で "startup-config" の更新時間が確認できます。
RT1#show startup-config
Using 879 out of 131072 bytes
!
! Last configuration change at 12:16:51 UTC Tue May 5 2026
!
version 17.16
service timestamps debug datetime msec
service timestamps log datetime msec
!
hostname RT1
!
boot-start-marker
boot-end-marker
!
!
no aaa new-model
!
!
!
!
!
!
!
!
!
!
!
!
!
ip cef
login on-success log
no ipv6 cef
!
!
!
!
!
!
!
!
!
!
!
!
!
memory free low-watermark processor 79983
!
!
spanning-tree mode rapid-pvst
!
!
!
!
!
!
!
!
!
!
!
!
!
!
!
!
!
!
!
!
!
!
!
interface Ethernet0/0
 no ip address
!
interface Ethernet0/1
 no ip address
 shutdown
!
interface Ethernet0/2
 no ip address
 shutdown
!
interface Ethernet0/3
 no ip address
 shutdown
!
ip forward-protocol nd
ip forward-protocol udp
!
!
ip http server
ip http secure-server
ip ssh bulk-mode 131072
no logging btrace
!
!
!
control-plane
!
!
!
line con 0
 logging synchronous
line aux 0
line vty 0 4
 login
 transport input ssh
!
!
!
!
end

RT1#
業務での設定変更時は "show running-config" と "show startup-config" の中身を Winmerge などを用いて差分を取り、設定保存漏れがないことを確認することが一般的です。
これが一連のモード移行及び各モードでの操作内容となります。
5, まとめ
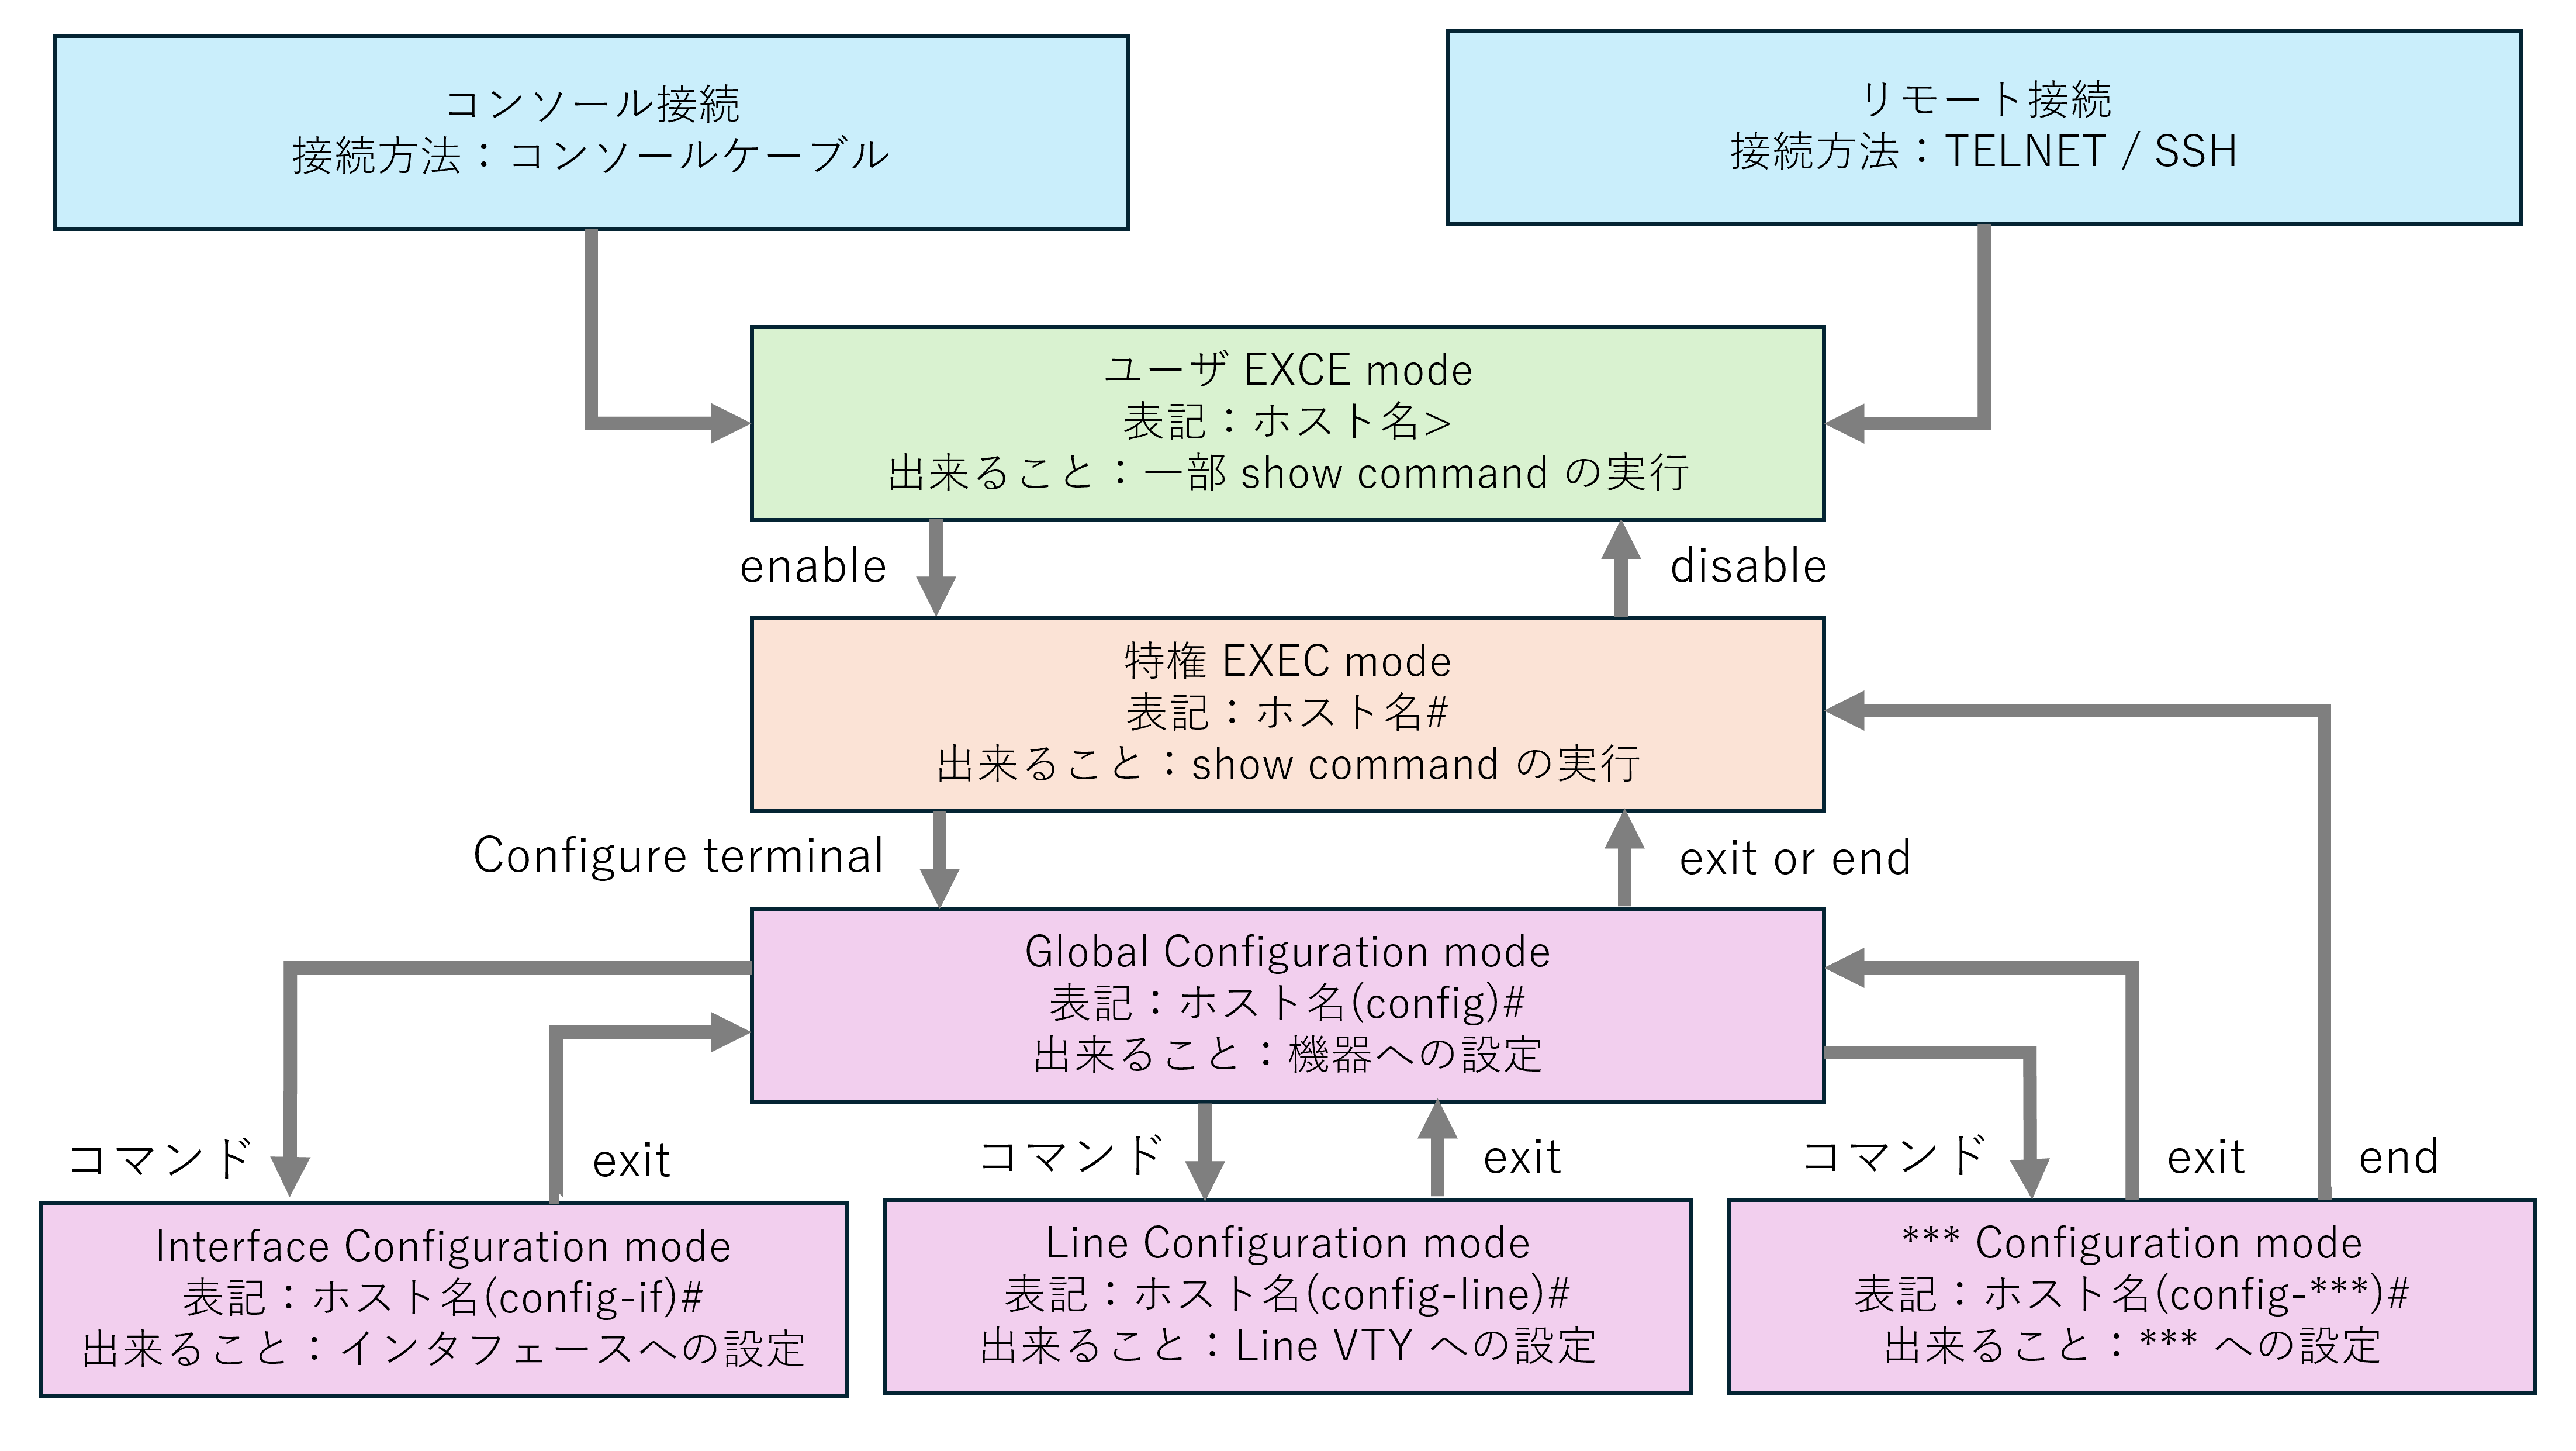
ネットワーク機器 (IOS/IOS-XE) には "モード" の概念があり、以下のようになっています。
各モードへは指定のコマンドを実行することで移行することが出来、「すべての Configuration mode」からは "end" を実行することで「特権 EXEC mode」へ移行することができます。
また、ネットワーク機器 (IOS/IOS-XE) を操作する上では
・どの設定をどの Configuration mode で行うか
・設定内容の反映を確認するにはどの show command が適切か
を覚えていくことが非常に重要なので、ハンズオンを通じてこれらの理解を深めていきましょう。
ログインすると、進捗を保存できます。
← ロードマップ に戻る